If you’re a learner driver in Australia preparing for your driving test, you’ve likely heard about “the three manoeuvres” that can make or break your assessment. These fundamental skills—reverse parallel parking, three-point turn, and kerbside stop—are essential components of your practical driving test and critical abilities you’ll use throughout your driving life.
While they might seem daunting at first, mastering these manoeuvres is entirely achievable with the right techniques, consistent practice, and understanding of what examiners are looking for. In this comprehensive guide, we’ll break down each manoeuvre step-by-step, share insider tips from driving instructors, and help you build the confidence needed to ace your test.
Understanding Why These Manoeuvres Matter
Before diving into techniques, it’s important to understand why these specific manoeuvres are tested:
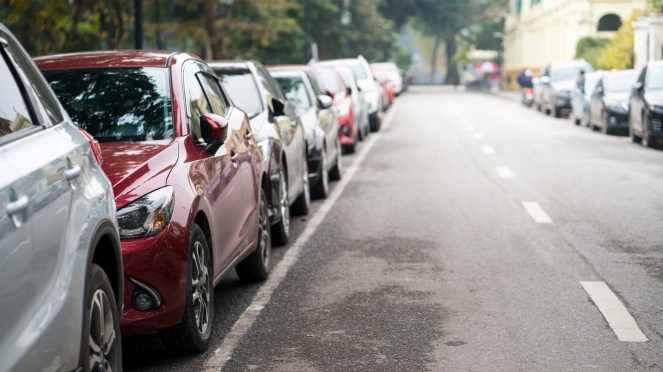
Reverse Parallel Parking demonstrates your ability to control the vehicle in reverse, judge distances accurately, and park safely in tight urban environments where space is limited.
Three-Point Turn (Turn in the Road) shows you can safely turn your vehicle around in a confined space while maintaining awareness of other road users and managing the vehicle’s position precisely.
Kerbside Stop tests your ability to park safely alongside a kerb, demonstrating spatial awareness, control, and the ability to position your vehicle safely for passengers to enter and exit.
These aren’t just test requirements—they’re practical skills you’ll use constantly in real-world driving, especially in busy city environments, residential streets, and shopping areas.
Manoeuvre 1: Reverse Parallel Parking
Reverse parallel parking is often considered the most challenging manoeuvre for learner drivers, but with the right technique and practice, it becomes second nature.
The Step-by-Step Process
Step 1: Find Your Starting Position
Pull up alongside the car in front of the space you’ll reverse into, leaving about 30-50cm (roughly arm’s length) between your vehicle and theirs. Align your vehicle so your door mirrors are roughly level with each other. This is your reference point.
Stop completely and select reverse gear. Check all mirrors and blind spots before beginning the manoeuvre.
Step 2: Begin Reversing Straight Back
Start reversing slowly, keeping your vehicle parallel to the one beside you. Keep checking mirrors and looking behind you alternately. Continue straight back until your rear bumper is approximately level with the rear bumper of the car beside you.
Critical tip: Go slowly. Speed is your enemy in parking manoeuvres. Clutch control (manual) or gentle accelerator (automatic) is key.
Step 3: First Turn (Steering Toward the Kerb)
Once your rear bumper is level with the other car’s rear bumper, turn your steering wheel one full turn toward the kerb (right if parking on the right side of the road). Continue reversing slowly.
Watch your passenger side mirror—you should see the kerb appearing and moving toward your car. You’re creating the angle needed to fit into the space.
Step 4: Straighten When Angled Correctly
Continue reversing at this angle until your vehicle reaches approximately 45 degrees to the kerb (you’ll see lots of kerb in your passenger mirror, and your car will be pointing toward the kerb at a clear diagonal).
At this point, straighten your steering wheel (turn it back to centre) and continue reversing straight.
Step 5: Second Turn (Steering Away from Kerb)
As your vehicle’s rear end clears the car behind you and enters the parking space, begin turning your steering wheel away from the kerb (left if parking on the right). This brings your front end into the space.
Watch both mirrors carefully. You need to clear the car in front while also not getting too close to the car behind.
Step 6: Final Positioning
Once your vehicle is parallel to the kerb (aligned with other parked cars), straighten your wheels completely. Position yourself centrally in the space—roughly equal distance from the car in front and behind.
You should be about 15-30cm from the kerb—close enough to be safe but not touching it.
Common Mistakes to Avoid
Starting Too Far From the Reference Car: If you start more than 50cm away, you’ll create too wide an angle and may end up too far from the kerb or struggle to fit in the space.
Turning the Wheel Too Early: If you turn toward the kerb before your rear bumpers are aligned, you’ll hit the kerb or end up at an awkward angle.
Going Too Fast: Speed makes it impossible to make precise adjustments. Always reverse slowly enough that you can stop instantly if needed.
Not Checking Surroundings: Failing to consistently check mirrors and blind spots is an instant fail. You must remain aware of other vehicles, pedestrians, and cyclists throughout.
Mounting the Kerb: Hitting or mounting the kerb during any stage is a critical error that will fail you.
Ending Up Too Far From the Kerb: If you finish more than 30cm from the kerb, you may be asked to try again or marked down significantly.
Pro Tips from Driving Instructors
Use Reference Points: Every car is different, so find reference points that work for your vehicle. Common ones include when a certain part of the car behind disappears in your mirror, or when specific landmarks align with your door pillar.
Practice in the Same Car You’ll Test In: Different vehicles have different turning circles, visibility, and dimensions. Practice in your test vehicle whenever possible.
Master Clutch Control: For manual transmissions, perfect clutch control lets you move at crawling speed, giving you maximum control and time to adjust.
Look Where You’re Going: While mirrors are important, regularly look behind you through the rear window to see the full picture.
Don’t Panic If You Need to Adjust: If you’re not happy with your position, pull forward and have another go. It’s better to restart than finish poorly parked.
Manoeuvre 2: Three-Point Turn (Turn in the Road)
The three-point turn allows you to turn your vehicle around in a narrow street where U-turns aren’t possible. Despite its name, it sometimes takes more than three movements—quality matters more than quantity.
The Step-by-Step Process
Step 1: Initial Positioning and Preparation
Position your vehicle on the left side of the road (normal driving position). Stop and assess the road—ensure it’s clear of traffic, parked cars won’t obstruct you, and there are no driveways or intersections immediately nearby.
Check all mirrors and blind spots. Signal right to indicate your intention.
Step 2: First Turn (Across the Road)
Turn your steering wheel fully to the right (full lock). Move forward slowly across the road at a diagonal angle, aiming for the opposite kerb.
Keep checking ahead and to the right for oncoming traffic. Go slow enough to maintain complete control.
Critical point: Stop well before reaching the opposite kerb—about 30cm away. Never mount or touch the kerb.
Step 3: Prepare for Reverse
Stop completely before the kerb. Apply handbrake and put the car in neutral (manual) or park (automatic).
Turn the steering wheel fully to the left (full lock in the opposite direction). This prepares you to reverse across the road.
Check all around—mirrors, blind spots, behind you. Look for approaching traffic from both directions. Select reverse gear and release the handbrake.
Step 4: Reverse Turn
Reverse slowly back across the road, now heading toward the original side at a diagonal angle. Your car should be moving backward and angling toward the left kerb.
Constantly check behind you and in your mirrors. Be particularly vigilant for traffic approaching from either direction.
Stop about 30cm from the kerb—again, never touch or mount it.
Step 5: Final Forward Movement
Apply the handbrake and select neutral/park again. Turn the steering wheel right to straighten up (or left if you need more angle).
Check mirrors and blind spots once more. Select first gear and release the handbrake.
Move forward, straightening your steering as you go, until you’re positioned correctly on the left side of the road, parallel to the kerb, ready to continue driving normally.
Common Mistakes to Avoid
Rushing the Manoeuvre: Taking it too fast reduces control and increases the risk of hitting kerbs or missing approaching traffic.
Hitting or Mounting Kerbs: This is an instant critical error. Always stop well before the kerb—30cm is a safe distance.
Failing to Check for Traffic: Not thoroughly checking for approaching vehicles before each movement is dangerous and will fail you.
Too Many Movements: While it’s not automatically a fail, taking 5-7 movements suggests poor planning or control. Aim for 3-5 movements.
Rolling Backward or Forward: Not properly securing the vehicle with the handbrake between movements can cause dangerous rolling.
Incorrect Gear Selection: Being in the wrong gear for your intended direction of travel is a serious error.
Blocking Traffic: Taking too long or stopping unnecessarily can obstruct other road users unreasonably.
Pro Tips from Driving Instructors
Full Lock is Your Friend: Always turn the steering wheel to full lock in each direction to minimize the number of movements needed.
Stop Before You Think You Need To: It’s better to stop too early from the kerb than to hit it and fail.
Master Clutch Control Again: Slow, controlled movement is everything. Your clutch foot (manual) or gentle accelerator (automatic) controls your success.
Choose Your Location Wisely When Practising: Practice on quiet, wide streets initially. As you improve, gradually practice on narrower roads that simulate test conditions.
Count Your Movements During Practice: This helps you gauge if you’re using full lock effectively and planning well.
Stay Calm If Traffic Approaches: If a vehicle approaches during your manoeuvre, stop safely, let them pass, then continue. Don’t panic or rush.
Manoeuvre 3: Kerbside Stop
The kerbside stop seems simple, but requires precision to execute properly. You’ll be asked to pull over and stop alongside the kerb at a location chosen by the examiner.
The Step-by-Step Process
Step 1: Receive and Acknowledge the Instruction
The examiner will ask you to pull over when safe to do so. Acknowledge with a simple “yes” or nod, but don’t react immediately.
Step 2: Assess the Situation
Quickly scan ahead for a suitable stopping location. Look for:
- A clear stretch of kerb without driveways, bus stops, or intersections
- No parked cars blocking potential stopping spots
- Sufficient room (at least 2-3 car lengths of clear kerb)
- Legal parking area (check for yellow lines, clearway signs, restrictions)
Step 3: Signal and Position
Check your left mirror and blind spot. Signal left well in advance (at least 3-5 seconds before stopping).
Begin moving toward the left side of the road, gradually reducing speed.
Step 4: Approach the Kerb
As you approach your chosen stopping point, aim to position the vehicle parallel to the kerb.
Use reference points to judge distance—many drivers use the left kerb appearing at a certain point on their bonnet or the kerb line in their left mirror.
Continue checking the left mirror to ensure you’re approaching parallel to the kerb.
Step 5: Final Stop
Bring the vehicle to a smooth, complete stop. Your vehicle should be:
- Parallel to the kerb (aligned with the road direction)
- 15-30cm from the kerb (roughly a hand’s width to a foot)
- Not touching or mounted on the kerb
- Clear of driveways, intersections, and bus zones
Step 6: Secure the Vehicle
Apply the handbrake firmly and select neutral (manual) or park (automatic).
Cancel your indicator. The manoeuvre is complete.
Common Mistakes to Avoid
Stopping Too Far From the Kerb: Finishing more than 45cm from the kerb is considered poor positioning and may result in a fail.
Stopping at an Angle: Your vehicle must be parallel to the kerb, not angled toward or away from it.
Stopping in an Illegal or Unsafe Position: Blocking driveways, stopping too close to intersections, or parking in clearways will fail you.
Not Signaling or Late Signaling: You must signal left well in advance—ideally 5 seconds before stopping.
Harsh or Sudden Braking: Smooth, controlled stops demonstrate better vehicle control than sudden, jerky stops.
Forgetting to Apply Handbrake: Not securing the vehicle properly is a serious error.
Stopping in an Obstruction: Blocking traffic flow unnecessarily or stopping where you create a hazard fails you.
Pro Tips from Driving Instructors
Don’t Rush the Instruction: You have time to find a suitable, safe stopping position. Don’t jam on the brakes at the first kerb you see.
Use Your Mirrors Throughout: Constantly reference your left mirror as you approach to judge kerb distance.
Practice Depth Perception: Different vehicles have different widths. Spend time in empty car parks practicing pulling alongside lines until you can accurately judge a 20cm distance.
Look Well Ahead: Scan 50-100m ahead for clear stopping opportunities so you’re never caught without options.
Smooth is Better Than Fast: A controlled, smooth stop from 40km/h is far better than a quick, jerky stop.
Make It Second Nature: Practice kerbside stops constantly during your learning—every time you drive, practice controlled stops at appropriate locations.
General Tips for Mastering All Three Manoeuvres
Practice, Practice, Practice: The more you practice these manoeuvres, the more confident and comfortable you’ll become. Practice in different locations with varied conditions, such as busy streets or empty car parks, to simulate real-life driving situations.
Stay Calm and Focused: Nerves can affect your performance. Take deep breaths, stay calm, and focus on one step at a time. If you make a mistake, don’t panic — just fix it and move on.
Ask for Feedback: If possible, ask your instructor or a more experienced driver to watch you perform the manoeuvres. They can give you valuable feedback and point out areas for improvement.
Know the Rules: Familiarise yourself with the road rules and guidelines for each manoeuvre. Being well-versed in the rules will help you remain confident and focused during your test.
Conclusion
Acing the three manoeuvres is a crucial part of passing your driving test and becoming a confident, safe driver. While these manoeuvres may seem daunting at first, consistent practice, focus, and applying the right techniques will make them second nature. Whether it’s parallel parking, reverse bay parking, or a three-point turn, mastering each will build your driving confidence and prepare you for real-life driving situations.
If you’re looking for expert guidance and practice, consider enrolling in Driving Lessons Melbourne with Monika’s Driving School. Their professional instructors will help you refine your skills, ensuring you’re fully prepared to pass your driving test with ease. Remember, practice and patience are key to success!